 Our review:
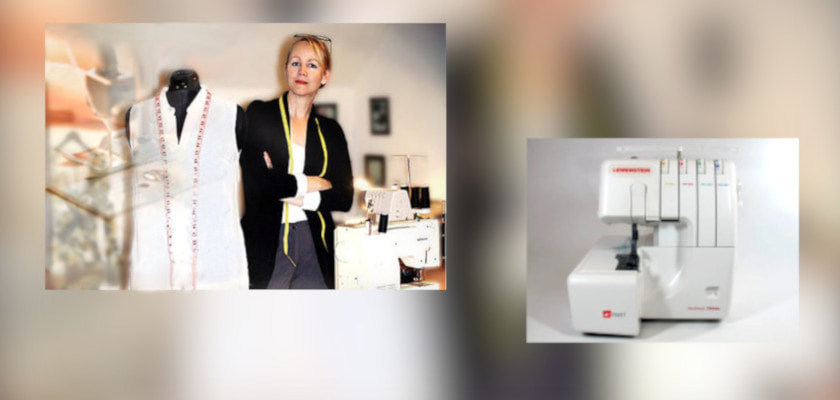
First impression: Excellent packaging. The lock machine is packed tightly with lots of polystyrene for protection. It arrived in perfect condition. The lock machine comes with a handy collection tray, for saving threads and dust ! The container is not large but it fits well. The overlocker looks plain. For a techie who loves buttons, technical gadgets, and flashing lights, this may be a disappointment. However, for those who loves simplicity and no unnecessary frills, the machine looks perfect. The machine is made of strong plastic (not metal). Kit is therefore easy to lift, saving weight and avoiding an old-fashioned look. Its design is even child-friendly crounded corners. This makes the machine look friendly, feminine and, above all, easy to use. The machine stands firm/steady on a desk. Let’s get to work! 1. The cover and the manual: The supplied cover (plastic cover) is made of plastic. It is ideal for preventing dust, one should replace it with prettier design. Time to make one! The manual limits itself to four languages, Dutch, German, English, and French. Dutch is immediately on the first language, at the far left of the page. The manual is in A4 horizontal format. The letters are small (reading glasses needed!) The visual instructions are large and clear. 2. Preparation: Starting up, is not the best part of the process. But the manual and Matri, will pull your through. Lots of articles have been written about starting up a locker, because threading is often so difficult that there are enough seamstresses who throw the lock machine out the window if they haven't given up the fight and and accept cutting and zigzagging forever. Though kickstarting the process is tricky, once you have it going, a lock machine offer endless posibilities. (see point 3.) The lighting is good. The light appears clear and focused. Replacing the light is easy. This is described in the manual on the very last page (40). The preparations can also be seen on the videos: https://www.matri.eu/lockmachines/lewenstein-lockmachine-700de 3. Threading: The manual is clear, even for a beginner. Threading the threads is described per thread on a whole page. Threading the upper gripper and the lower gripper is equally difficult but both the manual and the inside of the flap clearly indicate this, per color. Do not give up should the first attempts leave you wondering. In the long run, it will be just as easy as the sewing machine and you will settle in a routine just like using a sewing-machine. Tip: start with red threads. This makes it easier to see what you are doing and you are less likely to make mistakes, such as with white threads. 4. Overlocking: With a sewing machine you keep a distance to ensure thread tension. With a locker you can "play" with the thread tension. On pages 24 and 25 of the manual, you find extensive instructions should one of the four threads fails to being properly tensioned. Tip: The book: The Overlocker Technique manual from Julia Hincks, describes in detail how you can make beautiful stitches with 2-thread, 3 or 4-thread settings. The sound of the engine is normal. The free-arm option is IDEAL! Now you are able to lock a sleeve neatly and easier. The free arm option makes creating couture a lot easier because you can work far more precisely. 5. Accessories: The purchased locker foot set is highly recommended should you intend to use the lock machine intensively.https://www.matri.eu/naaimachine-onderdelen/overlock-machine-voeten/lewenstein-overlock-voeten/overlock-voeten-set-5-stuks-1332 This set makes it possible to blind-hem, to lock elastic fabrics even better, to thread in cords or pearl chains, and to piping and wrinkling. The blind set includes the blindhem foot, which is an ideal foot if you want to blindhem large pieces, such as curtains. Blindhemming always seems a lot of work, but with this foot it is a piece of cake. We tested the feet and were especially enthusiastic about the rolled-hem foot. This is ideal for thinner fabrics and still looks a lot better than normal hemming. It is also fun to do it with the locker. The pearl foot is a nice extra accessory for finishing a real couture garment. You probably won't do this so often, but if that possibility is there, and it's not at all that difficult as you think at first, you'll probably do it more often. After all, it gives a finishing touch or a very personal touch to a piece of clothing. Schedule an afternoon to practice with the feet and that time will pay for itself in even better working with the overlocker! An explanation of the use of the feet: click on this link. Maintenance The manual contains tips for maintenance and trouble-shooting in the event of problems. The supplier's website also contains a few links with tips for maintenance. Spare parts are available: https://www.sewingmachine-parts.com/overlockers Lost manuals can be downloaded; by brand and type of locker on the above link. Replacement of the blades and the light are described in the manual. Please always switch off the lock machine first! Replacing the blades is a job that you will not have to do often. The blades are razor sharp and have a long service life. ALWAYS buy an extra set of blades for the locker. It happens very often that you accidentally locked a pin and no matter how fast Matri is with delivery time, you still have to wait another day for a new knife. This extra purchase is a necessary part of your locker adventure. Concluding
Comments are closed.
|
All about creating your own Chanel-Style jacket, Chanel-lovers information, Historic Costumes, Couture & Sewing book reviews and tutorials.

By: Marga van der Vet,
50+ model
Content creator

|