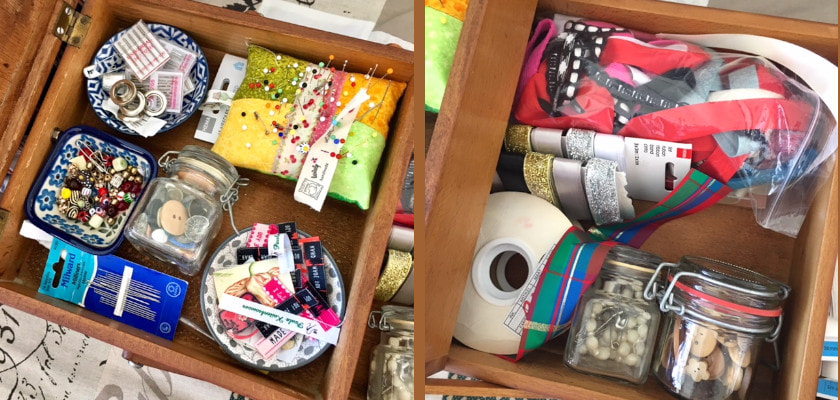
 When you plans your meals, it's often not just about the evening diner or a few days ahead, but you also need the basics. Butter, eggs, sugar, toilet paper and garbage bags.... These are the 'things' you don't want to miss at home. The necessarry basics of the kitchen or a householding. It is quite similarly with sewing; you need the 'basics' as well, as the beautiful fabrics. Cheap or expensive? You are working on a sewing project and suddenly you notice that you do not have interfacing in stock. Now you cannot reinforce the front pieces or the collar and you can not go on with your sewing project. Running to the stores (if these are nearby...) or even ordering online quickly often costs more money (and time). If you already bought this interfacing with your previous order, you would not have to stop the sewing project... Alternatives are not always the solution Then reinforce the collar with a scrap of fabric? Sometimes it works, but not always. Or use a different color thread that does not match the fabric but seems acceptable? Fine, but you might regret it later and think: "Oh damn, I should have had a thread that is matching the fabric..." Tips & Tricks The tip for every seamstress: make sure you always have the basics at home, or better said: in your studio or sewing studio. Check your stock regularly and supplement it if necessary. Or add it when you spot a great offer somewhere. After all, there are enough basic necessities that you almost always need. It is better not to pass an advantageous offer, because we said it already: if you need it, a quick purchase is often twice as expensive.  But what are those basic necessities? We have made a list for you. Bring it with you when you go to a fabric store, the market or a fabric fair. The same goes of course for online fabric stores, sewing machine stores and haberdashery stores. Also keep an eye on the offers there. Threads (make sure you always have black, white and beige in stock) Vlieseline and interfacing (in anthracite and white) Pattern paper (normal paper doesn't work, neither does toilet paper ...) Buttons, snaps, eyelets and hooks (really you can't have enough of those!) Sewing machine needles (the latter always breaks off on a Sunday if you've just planned a 'sewing day'). Also make sure you have a stock of jeans needles, stretch needles and assortment. Sewing machine lights (always handy to have one in stock!) Tape measures and scissors! (You can't have enough of that either, because there are often roommates who borrow them 'temporarily' or they disappear without a trace in another dimension ... Clothes hangers (order in the chaos!) Lining fabrics (elastic and non-elastic. Have a few yards of each in stock in easy basic colors like beige, off-white or a dark color) Last but not least: buy sewing machine accessories: extra sewing machine feet, bobbins, a sewing machine bag, etc. These always come in handy and you need more often than you think!  Also read:
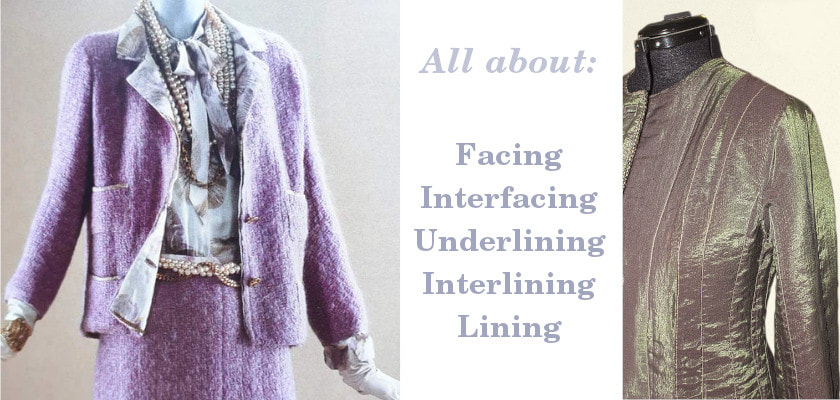 How closely do you look at the seam finishes, top stitching and the inside of all the garment pieces you created? In the world of bespoke couture, the inside fabrics and finishes are as important as what you see on the outside. A meaningful story A great story my husband told be comes to mind. He was painting a bathroom for one of his clients, the very demanding and formidable Mrs. O. After he was done, Mrs. O came in to inspect her new and improved bathroom. She was very particular about her expectations, so to check the quality of his work she bent down to check if the toe kick on her cabinet was not overlooked. In the process, she noticed that not only the toe kick was painted, but behind the cabinet was painted as well. Mrs. O looked at him and said: “Anyone who is so meticulous to even paint the places that would not be seen is a master of his trade.” The same goes for any art or craft. The hallmark of bespoke sewing is excellent fit and finish. Inside construction details, like correct underlining, lining and interfacing, are all parts of that. If you are just starting in sewing, you may overlook these important details or think that since no one can see them, they don’t matter. Nothing could be further from the truth. They play a crucial role in the look and feel of the finished garment. Let me explain the differences between these materials, their uses and little tips from the Haute couture masters of the past that can teach even old dogs like me new tricks.  Facing to Make Edges Look Pretty Facings are used to finish garment’s raw edges, such as neck, sleeve and pocket edges, and even jacket hemline. Facings can be cut as extensions of the garment or as separate pieces. Dior ateliers frequently created self-facings by extending the edge of the pattern piece and then folding it back which eliminated a bulky seam and created a soft and gentle roll. (Palmer) If the facings are cut separately, they either duplicate the garment edges or cut as bias strips and molded to the shape of the edge. An important consideration when you see facings in your pattern pieces is the weight of your chosen fabric to make sure there are no bulky seams. When I started sewing vintage clothes, I got a cute Givenchy dress pattern which I planned to make from medium weight linen. The pattern had very complicated facings, as is typical of earlier Givenchy designs. I soon discovered that it added too much bulk to the neckline even after pressing. I had to scrap my unfinished dress and get a lightweight silk fabric instead. The fabrics used for facings are typically self or contrasting fabric. Just make sure that the care instructions match. As I was working on this article, I discovered a great idea to use a lightweight lining fabric as facing which was Chanel’s favorite technique. (Shaeffer, Couture Sewing Techniques) 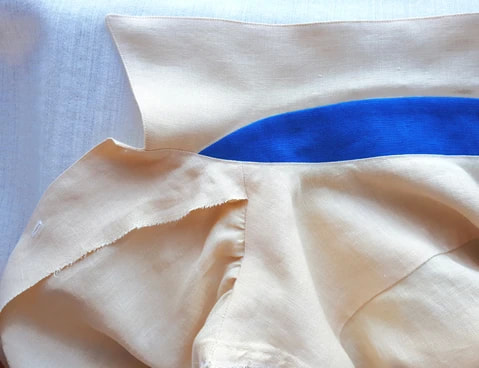 Interfacing To Control the Shape Interfacing is basically additional fabric used for support in between a facing and a garment to prevent stretching in necklines, buttonholes, waistbands, and pocket edging and to control the shape of the collars, cuffs, waistbands, lapels, plackets, sleeve caps so they don’t collapse during wear. (Nudelman) Have you ever made a shirt that looked great before the first wash and got a misshaped collar stand and a curled or wrinkled collar after? This is because you didn’t select the correct interfacing to support the fabric. I usually get the samples of the face fabric and different interfacings I have in my collection and I feel them with my hands to compare them for thickness. Keep in mind that the interfacing fabric can be crisper than the fashion fabric you chose, but it can never be heavier than your fashion fabric. (Khalje) Another important trick of the trade is to use different interfacing for different parts of the garment. For example, the interfacing for a shirt collar stand or a sleeve cap of a tailored suit is usually crisper than interfacing for a pocket. I use muslin, cotton batiste, handkerchief linen and lightweight, medium weight and heavy weight hair canvas as interfacing. Chanel was very creative in using lining fabrics for interfacing. (Shaeffer, Couture Sewing Techniques) You can also use silk organza, silk habotai, organdy, cotton flannel, lamb’s wool, net, tulle, crinoline, Egyptian cotton, faille, silk taffeta, charmeuse, chiffon, and even self-fabric. There are many choices here. It is important to make sure that the care instructions of all fabrics match. With practice, you will know right away which interfacing to use for your project. A word of advice: keep all the bigger scraps of interfacing to use in your next projects. The interfacing is usually cut on a bias, especially for a collar, a bodice front or a cuff to avoid it being stiff. But you can cut interfacing on lengthwise or crosswise grain if you don’t have enough fabric. 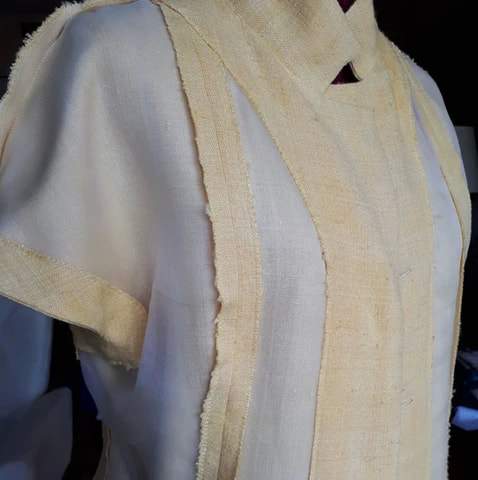 Underlining to Reinforce Underlining, also called backing or mounting, is used to reinforce very fine delicate fabrics, such as lace, chiffon, organza, raw silk. It also makes sense to support loosely woven tweeds so these fabrics don’t lose their shape after construction. The difference between interfacing and underlining is that interfacing is attached to just a part of the garment, like a collar, a pocket or just the facing part of the bodice, with seam allowances of the interfacing usually trimmed off. Underlining is attached to all pattern pieces. Each underlining piece is cut as a copy of the main pattern piece. They are attached to each other and treated as one thereafter with seam allowances finished together by overcasting. You often see the underlining instructions on designer patterns from the 50s and 60s. For example, Givenchy liked to underline all pattern pieces on his dresses and blouses not only for fabric support reasons but also to provide a layer to which the complicated facings can be inconspicuously attached. Another strong reason to use underlining is in bridal couture. For example, before you apply lace or beading to silk, it should be strengthened with underlining fabric to withstand all that additional weight. 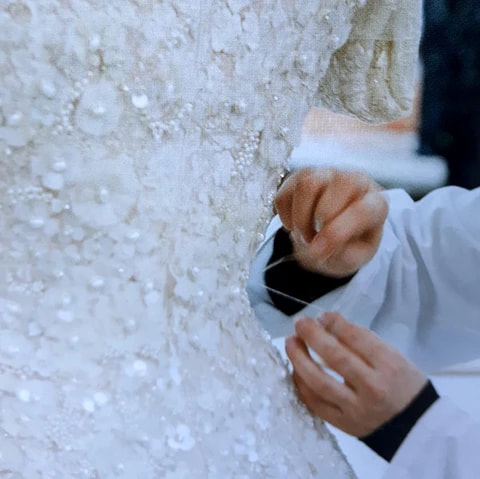 Fabrics often used for underlining are silk organza, handkerchief linen, muslin, flannel, cotton batiste, or even self-fabric. It is typical to have all pattern pieces underlined but it is fine to use different underlining for different pattern pieces. For example, on wedding dresses, you may want to choose a slightly firmer (not thicker!) underlining fabric for the bodice to support the beading work, the weight of the skirt and the sleeves and to cover the boning. (Khalje) Interlining for Added Warmth As if it wasn’t confusing enough, interlining is another layer which is also sandwiched between the lining and the fashion fabric but it is mostly used to add warmth to the garment without adding too much bulk. (Nudelman) Horsehair canvas, domette or flannel fabrics can be used for interlining the chest panels and backs of tailored jackets and coats. Interlining can be attached by hand or machine-quilted right over the interfacing. Lining to Cover It All Up Lining is the material you are most familiar with. After you finish the jacket of a skirt, you usually (not always) attach a lining and it is that final couture finish to cover up all the ‘guts’ of the garment that you don’t want to see, like unfinished seams, any clips or darts, and pieces of interfacing and/or underlining. Think of lining as another luxury detail which feels fantastic next to your skin when you wear it and makes your garment last longer. Christian Dior never used cheap fabrics as linings and he wrote in his memoires that “everything that does not show or shows very little should be made of just as good - if not better - materials than what is apparent”. Linings were a Dior signature. His designs frequently included transparent linings so you could see the skilled workmanship of finished seams and the excellent pressing of the darts. (Palmer) Another great master couturier, Cristobal Balenciaga, liked to use luxurious linings in his designs as well. (Miller) He was a perfectionist and a master craftsman who paid very close attention to details like that. The fabrics used for lining are silk organza, silk habotai, silk charmeuse, polyester, light weight cotton, acetate, rayon, and crepe. The lining fabric can match the fashion fabric or not if you want to achieve a special effect. Whatever fabric you use, it is important to match the care instructions of the lining fabric and the rest of the garment. In the haute couture world, the lining is skillfully attached by hand, but in ready-to-wear it is machine stitched to cut on labour costs. What you may not know is that the lining fabric can also be used as a trim on couture cuffs and collars for a special effect. Chanel designs often had such interesting trims. (Shaeffer, Couture Sewing: Making Designer Trims) The great Mademoiselle Chanel liked to line the jackets and skirts with the same beautiful and expensive fabrics as the blouses that were worn with them. It’s quite an haute couture touch, don’t you think? You can see now how all of the layers I explained have their roles to play in the final look of the bespoke clothing. Use only what you need to achieve the perfect fit and look, but make sure to choose the best materials, match their thickness and pay attention to care instructions. 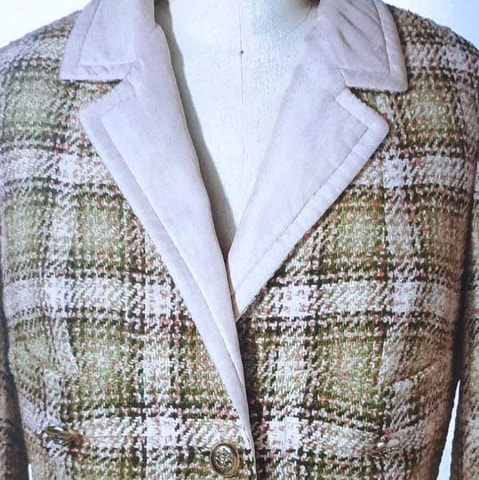 Bibliography: Clive Hallett, Amanda Johnston. Fabric for Fashion: The Complete Guide. London: Laurence King Publishing, 2014. Khalje, Susan. Bridal Couture: Fine Techniques for Wedding Gowns and Evening Wear. Iola: Krause Publications, 1997. Miller, Lesley Ellis. Balenciaga: Shaping Fashion. London: V & A Publishing, 2017. Nudelman, Zoya. The Art of Couture Sewing. New York: Fairchild Books, 2016. Palmer, Alexandra. Christian Dior: History & Modernity | 1947-1957. 45-46. Royal Ontario Museum and Hirmer Publishers, 2018. Shaeffer, Claire B. Couture Sewing Techniques. Newtown: The Taunton Press, 2011. —. Couture Sewing: Making Designer Trims. Newtown: The Taunton Press, 2016. —. Couture Sewing: Tailoring Techniques. Newtown: The Taunton Press, 2013. Amy De La Haye, Shelley Tobin. Chanel: The Couturiere At Work. New York: The Overlook Press, 1996  About the Author:
Elena Tran is a Canadian dressmaker and an entrepreneur passionate about haute couture sewing using beautiful fabrics and notions. After her career as a college administrator and mathematics professor, she pursued her interest in sewing and opened an online luxury fabric store baudekinstudio.ca. She is constantly learning and improving her craft. Her training includes lessons with the legendary coutureinstructor Angelina di Bello (Montreal, Canada), dressmaking program at Mohawk College (Hamilton, Canada) and online needlework courses at the Royal School of Needlework (London, UK). 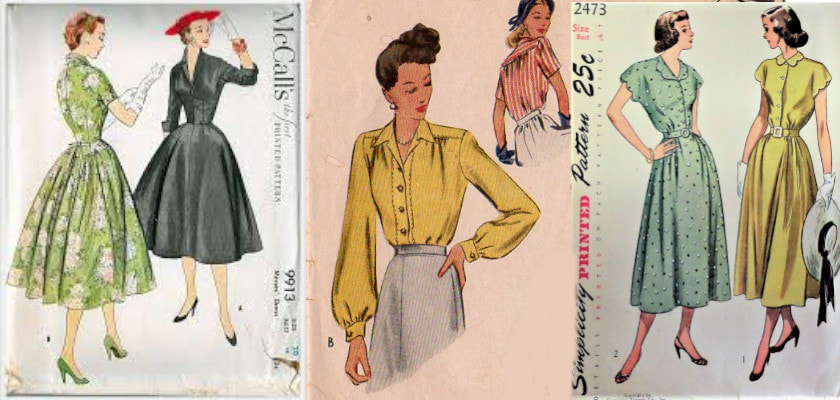 Vintage sewing patterns are very popular. Not only because their value is high (especially when they are collector's items!) but mainly because many seamstresses also consider it as a sport to actually make clothes of the sewing patterns. They make the clothes to wear themselves or for Cosplay and LARP events. But there are some common problems and we have tips to avoid them. Vintage sewing patterns are more popular than ever If you make yours clothes yourself, you are aiming it does not show... Seamstresses prefer not to hear, "Selfmade?" when they should actually be proud of the fact they made the cloths themselves. But they are afraid that there is always an undertone in that comment like: "You can see that, it is just not good enough". Of course that is nonsense, because self-made cloths are often unique, beautifully tailored and much more sustainable. With vintage clothing, however, there is a different tenor. "Self-made" makes more sense and sounds like a compliment. Finally, vintage clothing is often striking because of the shapes and lines and therefore super feminine. If you have found the right size, or if you have done some pattern adjustments, the clothing is also nicely tailored. 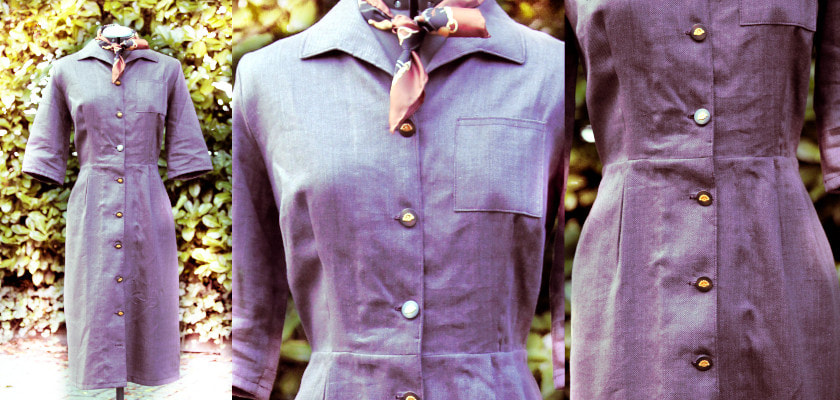 Cosplay and LARP Vintage sewing patterns are often very popular for Cosplay and LARP. Sewing patterns: 'Historical clothing' ánd Cosplay, but also all other retro- and vintage patterns. Because of the shapes in the vintage clothing, they are often nice to expand with corsets, crinolines underneath or to make mega dresses. But eventhough... you can run into problems while making vintage clothing ...  Pay attention! The pitfalls of vintage sewing patterns: 1. The times when 'vintage' or 'reto' was reallife, there were no elastic or stretchable fabrics. The sewing patterns are therefore all based on fabrics such as: garbadine, chiffon, linen, lace, cotton, jacquard and wool. The clothing must therefore be properly tailored because the fabric will not help you to feel comfortable or make you look super-shaped like stretch fabrics do... Tip: don't make these patterns of elastic or stretchy fabrics. This can cause the pattern to be incorrect and give strange results. Choose fabrics which are recommended for the sewing pattern or the onces you like to both sew and wear. 2. In vintage patterns there are many darts and pleats. If you want to create a nice upper body or a nice waist, you can count on it that there will be a lot of darts in the pattern that will create the desired shape. With some fabrics this is difficult to achieve and it looks less beautiful than you had hoped. Tip: learn to work with darts and pleats and consider it as a challenge. Use a sewing mannequin (adjusted to your size) to pin the darts in and 'play' with it until it fits. Take your time so it doesn't become a frustration. Once you get the feeling for 'shaping', it's more fun than you thought it would be! 3. Most of the patterns that show over-exaggerate waistes, often illustrated on the cover of the sewingpattern. But remember in these times women were always wearing corsets under their outfits. Nature was given a helping hand to create the waist that most women can now only dream of ... Tip: Do you still want a (very) small waist to fit in the vintage dresses? Buy an elasticated waist corset, one that fits snugly but creates a little more waist. In the 'shapewear' section of underwear, you can often find pleasant waist shapers that you can wear comfortably without gasping for breath or torturing your body. A tight, shape shirt also works wonders and often not only fits comfortably, but also looks really nicer under tighter dresses or blouses. 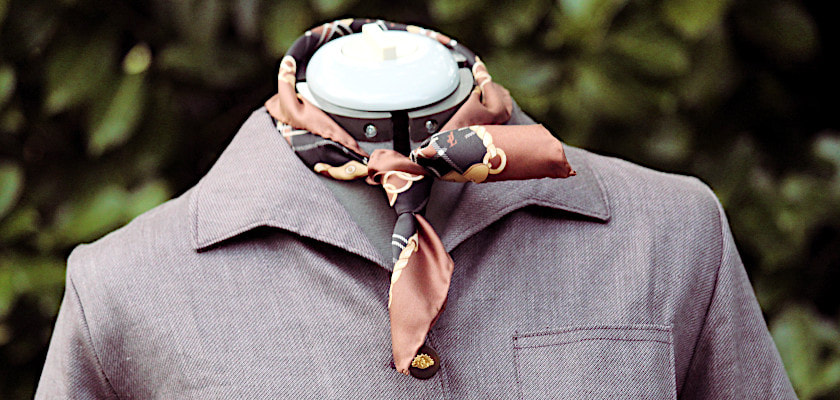 4. Collars often have different or even strange shapes (see picture above). The ends of the collars are often sharper, longer or sometimes weirdly shaped. Or like the top photo, far right: floral. Sometimes this really fits into the overall picture. Sometimes they are over-the-top or make the clothes look old-fashioned instead of interesting. Tip: adjust the collars to your own ideas. Copy the bottom length of the collar from the pattern and the rest of the pattern with a pencil. You then have the basis. After this you can make the collar ends as long, as straight, as round or as short as you would like. 5. Finally, we would like to point out that vintage dresses are often midi length. Or blouses are just a little too long (these were often worn in the skirt, never loose / casual over it). The length of the midi dresses and skirts can look nice, but also old-fashioned or messy, or accentuate thick calves, for example. Tip: very simple: adjust the length. Do this as the very last action. Try on the dress for a mirror, or on the sewing mannequin and let someone else help you. Your own perspective from above often gives a different picture than a person who is further away and sees a better overall picture. The length of blouses is easier to adjust. If you like to wear a blouse loose, don't make it too long, this looks more sloppy than nice and casual. 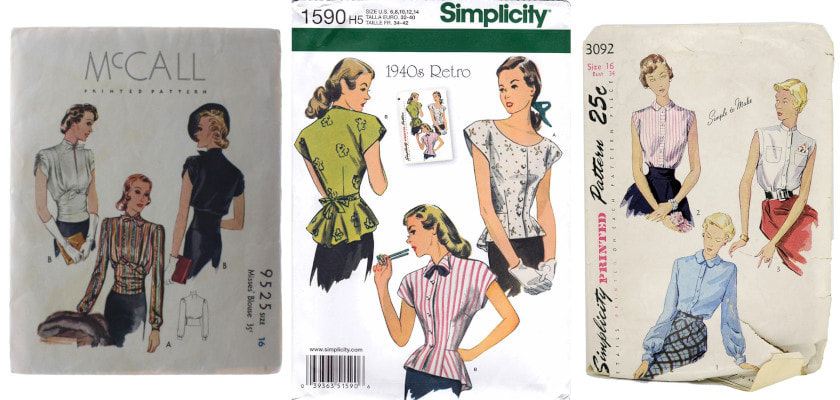 Advantages of vintage sewing patterns: But there are also many advantages of vintage sewing patterns. As we have already mentioned: the sewing patterns are often ideal for Cosplay and LARP and often eye-catchers because of the beautiful shapes and special lines. Moreover, the fabrics that are used are also different than usual or have a nice 'retro print'. Another plus is that many patterns can be used as a 'normal pattern'. See above: The blouses are often classic, timeless and just super feminine. Especially on the left: the blue blouse would look great combined with jeans, and high heels or higher boots. Remember what Mary said about Downton Abbey clothing: "I really wanted to take the blouses home, I was totally hooked." Finally: the vintage sewing patterns are often ideal for indulging in buttons and beautiful trims. Just like our beloved Chanel style jacket! Be creative, indulge yourself and make it unique. Get rid of mass production, throwaway clothes. Create your own clothes with beautiful vintage sewing patterns!   It is not a secret that Coco Chanel did not like 'prints'. At most a 'Breton stripe', but nothing more than that. According to Chanel, chic was mainly austerity in the design of the fabrics. Except for the tweeds and bouclé fabrics, these were luxurious and 'colorful' enough. Either you love it or you hate it Who likes prints? Most people love it. From tropical flowers to a 'tiger print', it can't be colorful enough. Especially in the summer we are crazy about to prints. It makes us happy and it looks great as a blouse or summer dress. But read Ines de la Fressange's books and one thing becomes very clear: prints are NOT DONE! According to her, you will not easily find a real Parissiéne dressed with 'a print'. The Parisian style is more about the monotonous colors, the creative combinations of trés-chic and elegance of the timeless classics.  Chanel style jackets and prints If we want to look stylish but occasionally deviate from the 'rules', then combining a Chanel-style jacket (self-made of course!) With a print underneath is definitely a nice idea. Who says that this can't look be chic and casual at the same time? Bouclé and tweeds, but also summer tweeds, are often very busy in terms of appearance. The fabrics are woven and there is always a beautiful mix of colors and sometimes even patterns. A blouse with a printed design underneath can easily come across as very 'busy' and a bit cheap. Fringes, edges and prints? Apart from that, the Chanel style is often characterized by a lot of fringes, beautifully finished trims and two or even four pockets stitched on the jacket. They should of course be the eye-catchers of your outfit. Taking all this into account, we would like to point out that a printed blouse, t-shirt or even pants, under a Chanel jacket, is fine if you observe the following rules:
Prints will never go out of style and occasionally combining with them may not be 'Paris' chic, but again not as 'not-done' as suggested in many style books and guides on Chanel couture and Parisian style. We love prints ... occasionally. 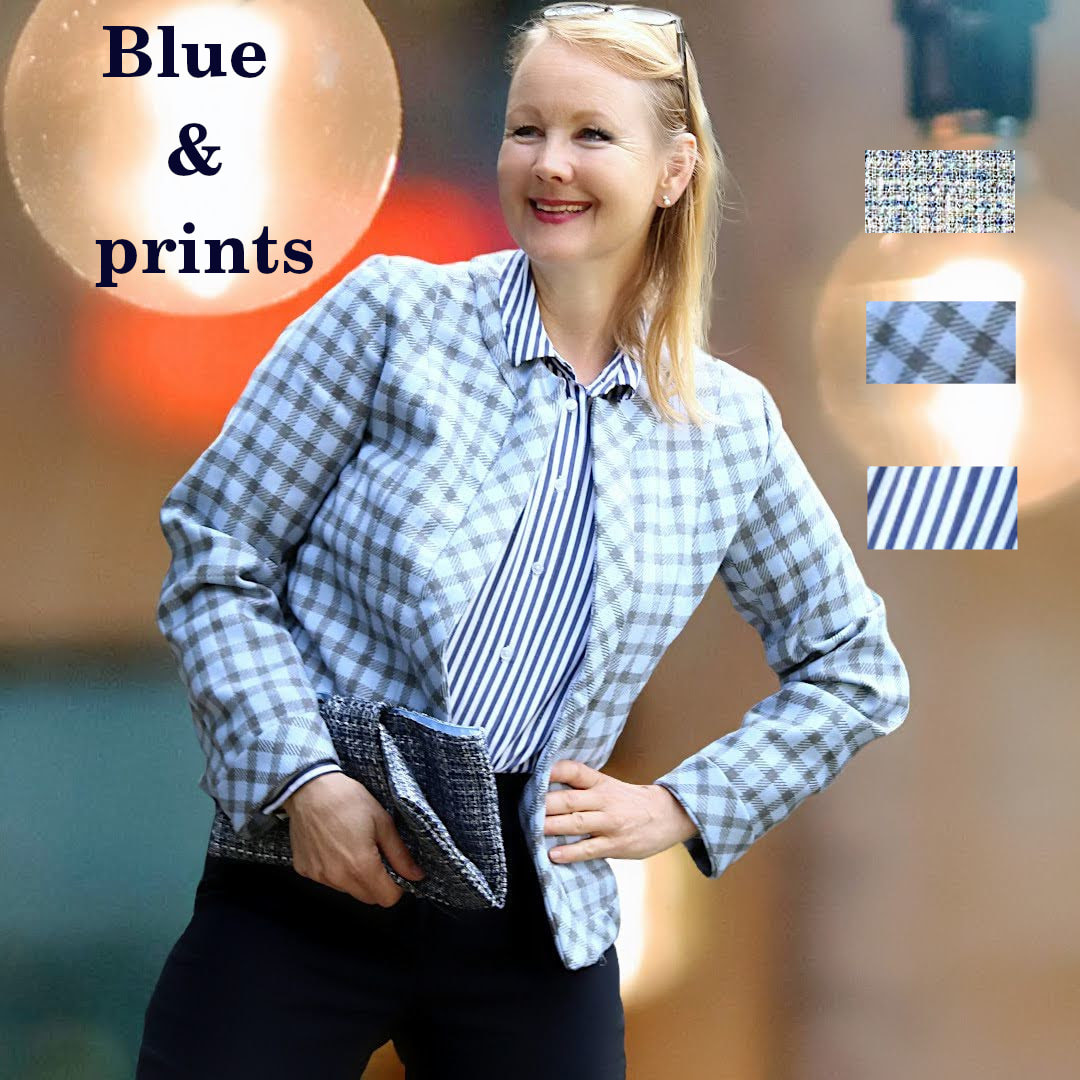  Nothing is as unfortunate as finding out halfway through a sewing project: it is a hopeless failure ... It happens to everyone. From beginners seamstress to advanced seamstresses who have been behind the sewing machine for years. Do not grieve and do not stop! With our tips & tricks you can prevent failed projects. 'What does not kill you, makes you stronger' A rather exaggerated statement, but there is encouragement in it. Of course it is a shame when a sewing project fails. All those hours you were working on it ... very unfortunate. And especially the materials: the fabric, the lining, the interlining, etc. Throwing them away hurts a lot. You may have become a seamstress to be more "zero-waste". And now you throw everything away ... Where did it go wrong? Of course you will learn from every failed sewing project. This is our number 1 tip! Because you don't learn anything from just throwing it away. Ask yourself for a moment: where did it go wrong? You learn from it. Did you choose the wrong fabric? Was the sewing pattern too difficult? Were you able to intervene in time or did you stubbornly continue even though you knew that the sewing project was not going to be a great outfit? Or did you really have no idea but only found out when you tried on the garment itself (or on the sewing mannequin)? Learn from this for the next time. Write it down in a sewing journal or if the pattern is not right, on the sewing pattern itself. Is that really necessary? Yes, in a year you will have forgotten it and you might make the same mistake again. so .... tips & tricks to prevent unsuccessful sewing projects:
 And even more tips & tricks:
Failed sewing projects happen to everyone. Don't give up, but try to learn from it. Do you have wasted fabrics or materials? Maybe you can still do something with it. See our tips: What to do with leftover fabric 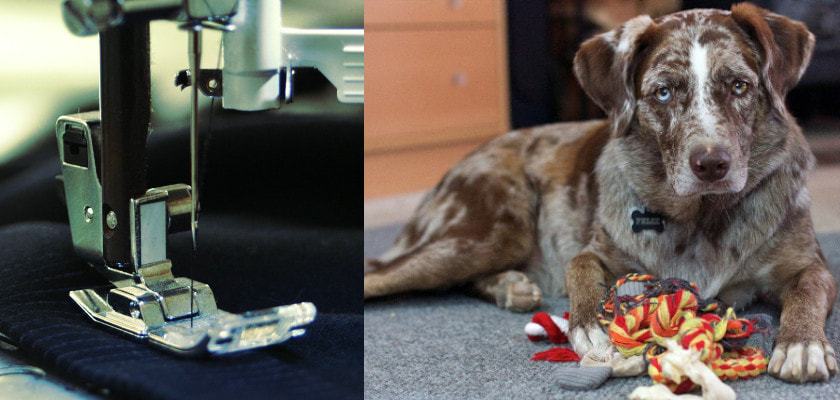 Or: a tip for people with pets: cut the fabric into strips, braid the strips and tie them in a thick knot. Now at least your dog or cat has been made very happy with the new toy ... (make sure there are no needles left in it!)
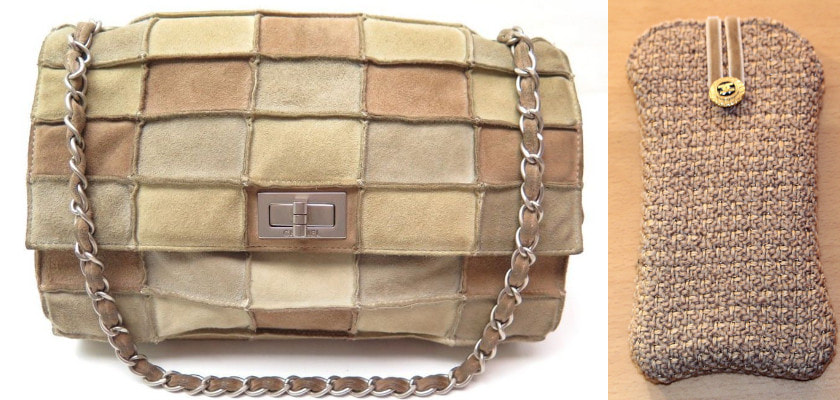
And especially be happy with the sewing projects that do succeed. We just don't talk about the failed sewing projects anymore ... deal? 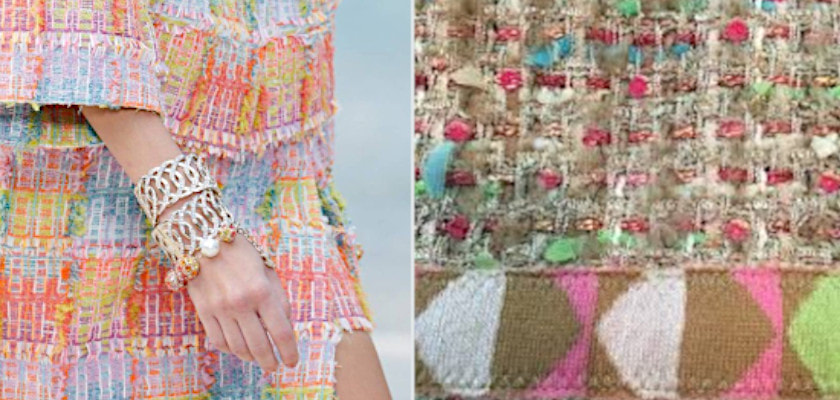 On the Vogue website we read a nice article about 'La Réunion's Patchwork Dresses Turn Symbols of Suffering Into Things of Beauty' Sarah Nsikak, fashion designer, focuses on sustainability and is fully focused on making patchwork dresses. Fortunately, she is not the only one: patchwork is back in fashion! Patchwork or Quilts? The difference between patchwork and quilting is that quilting works more with patterns and manual sewing. Quilting is a unique profession. At least three layers of fabric are stitched together, very small pieces of fabric are used and there is often a symmetrical pattern that is worked out. Quilting is a very old tradition and craft and in some cultures it is an important part of social activity, as part of traditions and sometimes even of commercial importance. Patchwork is nothing more or less than sewing pieces of fabric together. These can be pieces of fabric of different fabrics, materials and colors. Often this is then used to make clothing or simpler patchwork quilts, cushion covers, etc. The name for patchwork and quilting is often used interchangeably. But quilting is really something else than working with patches and making clothes or something else from here. 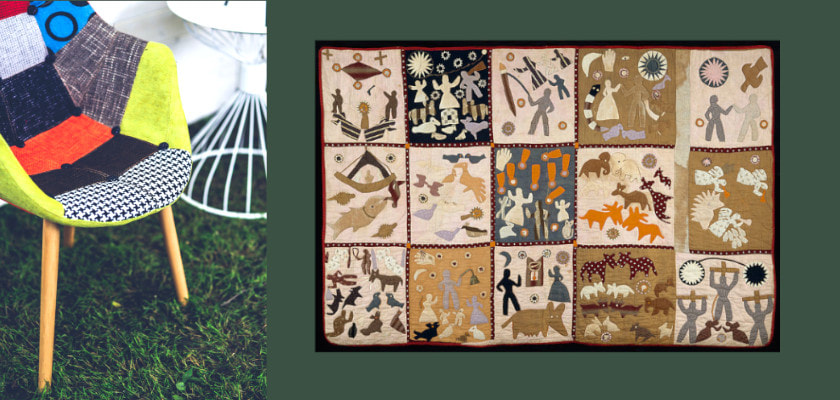 The revival of Patchwork Patchwork sounds out dated' and might remind you of Grandma's patchwork quilt who has been lying in the guest bedroom as a bed spreadfor ages.... Patchwork has always had the image of extremely economical people who work with scraps of fabric and sometimes create combinations that really don't look like much. But there is also magic with patchwork and beautiful quilts, patchwork quilts and clothing are made. Patchwork is experiencing a revival as we become more aware of the waste that the clothing industry entails. Moreover, the Corona crisis has opened people's eyes. We've all climbed behind the sewing machine ourselves to make face masks and most people discover they like to sew! Fashion designers have been working on sustainability and 'greening' for some time. See our review: Green Designed fashion. Not always successful, but every initiative is one. Working with remnants of fabric or upcycling of already used materials is a good goal! And making something beautiful out of it is a piece of cake for many designers and (hobby) seamstresses. During a broadcast of British Sewing Bee we saw several episodes in which the candidates were given an assignment to make something beautiful from their leftovers of fabric. The results were jackets, skirts, dresses and very nice children's clothing. The assignment concerning upholstery fabrics was also 'amazing'. The candidates were instructed to bring something from home. From old curtains to bed linen. These were all transformed into beautiful, usable summer dresses. Making a summer dress from net curtains and a sheet ... it is possible and the result was more than beautiful! 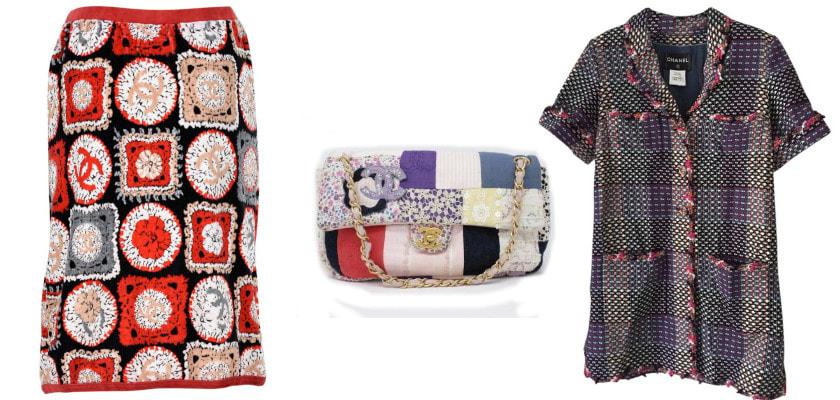 Chanel & Patchwork Unfortunately we can only find a few items from Chanel. But they are nevertheless eye-catchers par excellence. And the Fashion Industry is changing, so who knows, the following collections may come up with more sustainable patchwork designs if the workshops have to make do with the fabrics that are dusting in the warehouse or smaller pieces of fabric that have already disappeared in the trash can . Who cares whether something is 'in' or 'out of fashion'? For a fashion house a lot, but for people who would like to own 'a Chanel', the year of the collection is less important and the story behind it all the more. Tips & Tricks: patchwork with Bouclé fabrics Chanel has always been associated with Tweeds and Bouclé fabrics. These are not really the best fabrics for 'patchwork'. Yet the result is often great. Chanel's famous 2.55 bag has often been made of various tweed fabrics and also Bouclé. Also other bags and accessories. A few tips:
 Summarized:
In the fashion world there is a huge change going on with regard to sustainability. The use of remnants of fabric or fabrics that are supposedly 'out of fashion' is picked up in the form of patchwork. In principle, you can make anything with patchwork as a basis. From Haute couture to cushion covers for the camper. Patchwork with Bouclé fabrics or tweeds? Yes we can! And to get a beautiful 'Chanel-style' look, there are plenty of examples of the famous Chanel bag and some outfits from the catwalks. Be creative, sustainable and join the new trend: this is the fashion image of 2020 and the future! 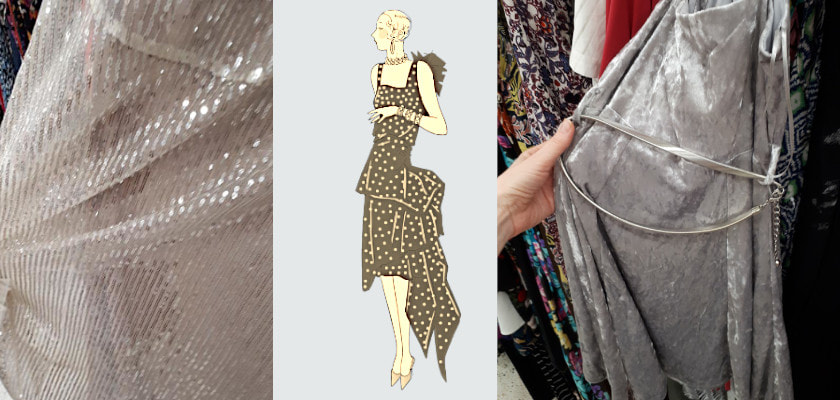 As a fabric connoisseur, I like the concept of upcycling because fabric to me is like precious gold and diamonds to a jeweler. When I touch luxurious Italian silk and feel the softness of Spanish bouclé tweeds, I am fully aware of the many labour hours that go into weaving these beautiful textiles and in sewing the final garments. I understand why some fabric costs are higher and I can tell the difference between Haute couture and fast fashion ready-to-wear. The price point argument set aside, all clothing was made by someone somewhere. When I see the clothes purchased in heaps and discarded so effortlessly, as if all the work that went into them means nothing, I get frustrated. Upcycling in fashion involves taking old or used clothes or fabric and making beautiful garments out of them thereby giving them a new and hopefully more glamorous life. With determination and creativity, it is possible to make a stunning garment out of gently used clothing. I have recently made a trip to Value Village, one of the larger Canadian second-hand stores near me, in search of some interesting ideas for a potential upcycling project. The thrift stores in North America may be different from Europe, but the shopping strategies are the same. Let me share my ideas for finding beautiful fabrics in the thrift stores with you. #1: Know what you are looking for before you enter the store to avoid impulse purchases. As with any fashion collection, look for some inspiration first and you can even create a moodboard to get an idea of the general colours and textures that you like. Don’t go into drafting a pattern yet, because your choice of fabric will ultimately dictate the design. Are you going to make an upcycled evening gown, a glamorous day dress, or an unusual trench coat? (Alternatively, you may already have a pattern in mind, in which case you just skip this step. Pull the pattern out and read the fabric suggestions before going shopping.) #2: Shop alone or with a friend who shares your vision. I personally prefer to shop alone when I am looking for ideas for my design projects because at that point I am focused and I am in my creative zone. But if you have a generous friend who shares your vision and knows what you are looking for, she/he can be your second pair of eyes in spotting a bargain. (Don’t forget to show your gratitude and take your friend for lunch afterwards.) You and your friend can go to different parts of the store so you are not looking in the same spot and don’t feel bad if you want to go back and take a second look. Sadly, there are just so many clothes and it’s easy to miss a great find. If you frequent the same store often, you will probably notice the days of the week that the new items are put on the shelves and you can focus on shopping on those days only. #3: Don’t look for your exact size, but for one or more sizes bigger. The bigger the size, the more fabric you get to play with. The clothing section in the thrift shops here is usually huge, and some of the items there are brand new or worn only once, like wedding dresses. Look through the clothes in the dresses, skirts and tops sections. Although tops don’t have much fabric, you can still use them for patch pockets, decorative welts and accents. And what about using those for couture appliques and trims? Are there any fully functional long zippers or even corsetry boning pieces you can use? Those items are expensive if purchased brand new. At this point you have to have an open mind, look past the dated garment because you are not buying it to wear but to use it for something else. Focus only on the fabric and how its colour and texture fit your vision for the upcycled garment. 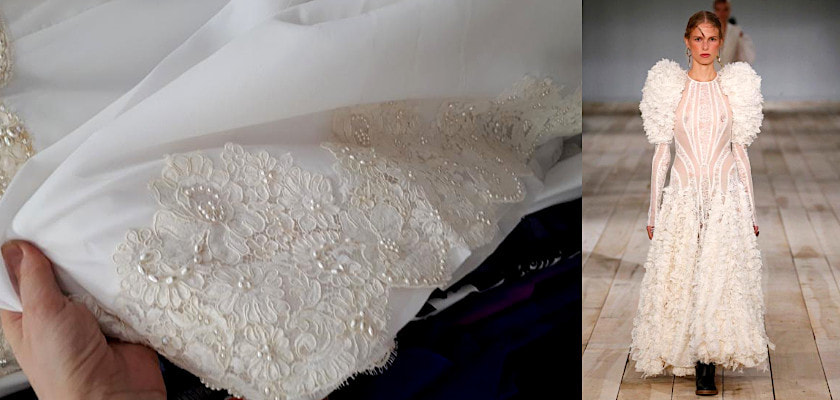 A gorgeous guipure lace with beading (and lots of it!!!) all along the hem of a voluminous large-sized wedding dress which will give you plenty of material for lace trim or applique. On the right is an inspiration: upcycled wedding dress from Alexander McQueen Spring 2020 runway. 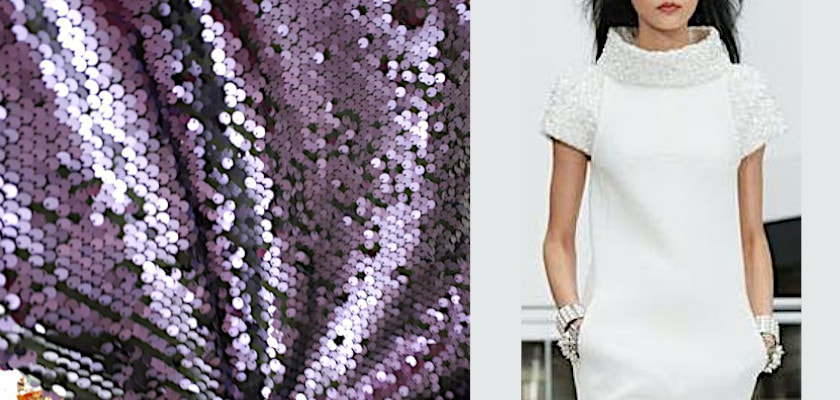 On the left is a medium size dress with overlapped blue spangles from top to bottom. On the right is your inspiration: a lovely day dress with beaded collar and sleeves from Chanel Haute Couture Fall/Winter 2017 runway. 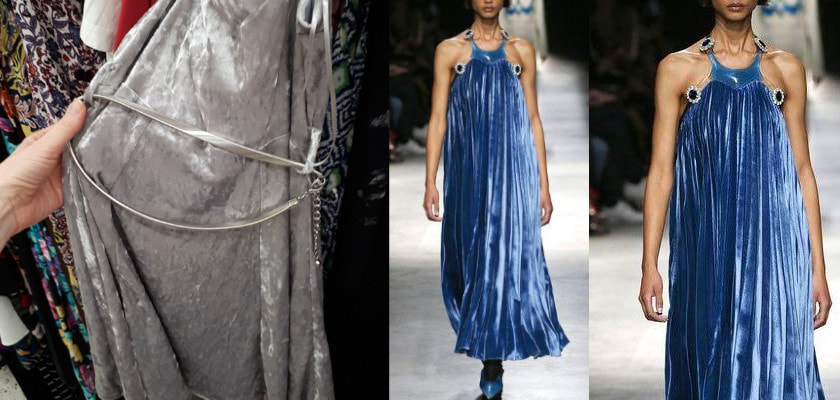 On the right is a lovely velvet dress with a 12” zipper on the side and a metal belt. On the left is an inspiration: a blue velvet dress by Burberry from their Fall/Winter 2020 runway #4: Look for interesting prints, weaving patterns and/or fiber content. Always refer back to your mood board to stay on target in terms of your general colour theme. The sophisticated weaving patterns like jacquard and velvet are not that rare, and if you are lucky you can find some gorgeous twills and satins in the wedding/evening dress section or sumptuous knits in the women’s tops. And the more natural the fiber content in the piece, the better. Find the garment’s care instructions which will tell you the exact fiber content. 100% silk or 100% linen items are rare, but you can still find those. 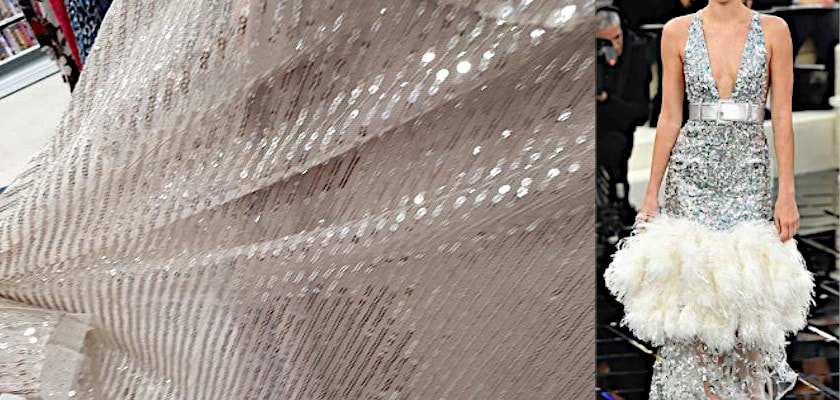 On the left is a large size dress with vertical rows of bright silver spangles on netting. These spangles would be great to use in gold work embroidery as well. On the right is an inspiration: a dress with generous embroidery throughout from Chanel Fall/Winter 2017, runway Also, check out the belts and scarves section. Many scarves are 100% silk or silk/cashmere mixtures. You can upcycle a wide silk scarf into a dress bodice, a beautiful summer tank top or sleepwear. #5: Hidden treasures in the drapery section. Depending on your project, you may find amazing yardage of fabrics in these sections. The store associates hang the fashion fabrics in this section. Unless you are an expert, you wouldn’t know if the fabric is made from natural fiber or not. Assume it is all polyester blends, trust your hand instead and feel the fabric. Is it rough and cold or silky and wonderful against your skin? Would you like to wear a garment made from this fabric? If in any doubt, put it back. #6: Most importantly, set your budget. And finally, be focused or you’ll end up picking up useless trinkets instead. Have a definite budget in mind. Are you going to spend $20 or $50? Your $4.99 and $8.99 purchases add up quickly, so hold your purse tightly and keep track of your items. You will have to make decisions on the spot because if you come back to the store tomorrow, the clothes you liked may not be there. Ask the store clerk about their return policies in case you change your mind. About the Author:
Elena Tran is a Canadian dressmaker and an entrepreneur passionate about haute couture sewing using beautiful fabrics and notions. After her career as a college administrator and mathematics professor, she pursued her interest in sewing and opened an online luxury fabric store baudekinstudio.ca. She is constantly learning and improving her craft. Her training includes lessons with the legendary couture instructor Angelina di Bello (Montreal, Canada), dressmaking program at Mohawk College (Hamilton, Canada) and online needlework courses at the Royal School of Needlework (London, UK). |
All about creating your own Chanel-Style jacket, Chanel-lovers information, Historic Costumes, Couture & Sewing book reviews and tutorials.
By: Marga van der Vet,
50+ model
Content creator
MargaStyle: Personal blog, Beauty & Lifestyle, Modelling, Yoga and happy 50+

|